A well-planned kitchen makes daily tasks simpler. Good layout keeps your counters clear and your tools within reach. These ideas help you store and use small appliances without clutter. You can create a space that works for how you cook and live. Many of these solutions are simple to set up. They can fit into any kitchen size or style.
1. The Countertop Command Center

Keep your most-used appliances in one spot. Choose a corner of the counter that is easy to access. Place them on a large tray or board to define the space. This contains crumbs and spills. It also makes cleaning quick. A simple DIY tip is to use a stylish baking sheet as your base. This creates a dedicated zone for daily tasks without a permanent installation.
2. The Under-Cabinet Appliance Garage
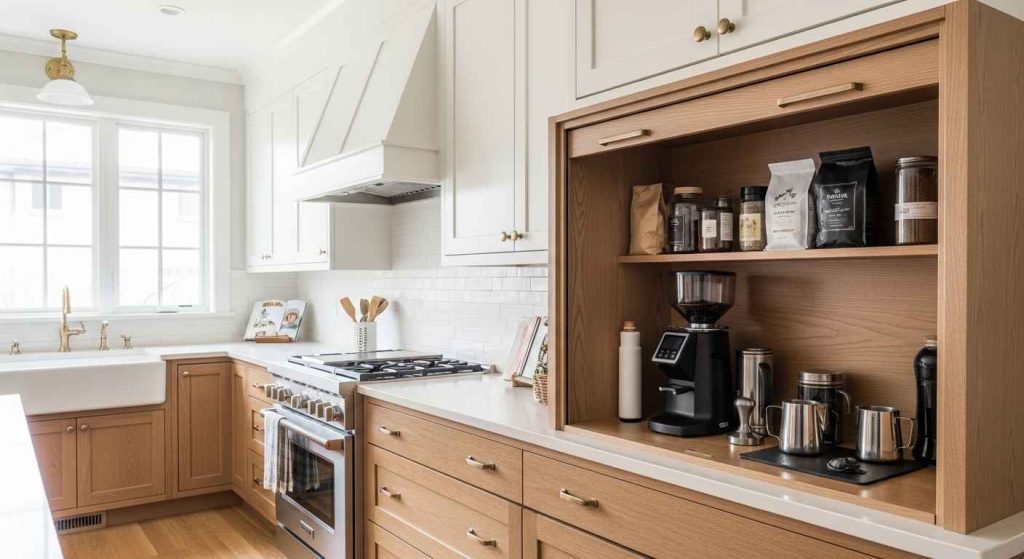
Tuck appliances out of sight but within arm’s reach. An appliance garage under a upper cabinet hides clutter. The roll-up or hinged door keeps the look seamless. You can store your coffee maker or mixer here. For a budget-friendly version, install a simple wooden box with a curtain instead of a door. This hidden storage solution keeps your counters looking tidy.
3. The Vertical Storage Power Strip

Stop searching for outlets. Mount a power strip vertically on the inside of a cabinet or on a wall. This gives you multiple plugs in one place. Use adhesive clips to keep cords from tangling. This is a simple DIY project that takes minutes. It creates a centralized power hub for your charging station or appliance corner.
4. The Pull-Out Appliance Pantry

Use a tall, narrow cabinet for heavy appliances. A pull-out shelf brings everything forward so you do not have to lift items from the back. This is perfect for mixers and blenders. You can install slide-out shelves yourself with a kit from a hardware store. This easy access system saves your back and cabinet space.
5. The Toaster & Coffee Niche

Create a built-in spot for your morning routine. A small niche in your backsplash or between cabinets holds your toaster and coffee maker. It keeps them off the main counter. For a budget-friendly idea, use a sturdy wall-mounted shelf as your niche. This breakfast corner keeps your routine contained and efficient.
6. The Breakfast Station Setup

Group everything for the first meal of the day. Place your toaster, coffee maker, and related supplies together. Store bread, filters, and mugs in the cabinet above or drawer below. A simple tray can corral smaller items. This organized start makes busy mornings flow smoothly.
7. The Appliance Library Ladder

Use vertical space with style. A sliding ladder lets you store less-frequently used appliances on high shelves. You can reach them easily when needed. Look for a budget-friendly rolling library ladder or build a simple wooden one. This functional feature adds character and solves storage problems.
8. The Corner Cabinet Carousel

Make use of awkward corner cabinets. A lazy Susan or carousel insert spins, bringing items to the front. This prevents appliances from getting lost in the back. You can find rotating shelves at most home stores. This simple spinner maximizes every inch of storage.
9. The Mixer Lift Mechanism

Store your heavy mixer inside a base cabinet. A lift mechanism gently raises it up when you need it. It hides away when you are done. These kits are available for purchase and installation. This heavy-duty helper saves counter space and makes baking easier.
10. The Magnetic Knife & Appliance Wall

Go vertical with magnetic storage. A strong magnetic strip can hold more than just knives. Some small, lightweight metal appliances can also be hung. This clears your counter and drawers. This is a very low-cost DIY project. A magnetic wall turns unused wall space into smart storage.
11. The Slim Appliance Cabinet

Use a slim, often wasted space for storage. A cabinet that is only a few inches wide can hold upright appliances. This is perfect for toasters and blenders. You can often find ready-made slim cabinets or build a simple box. This space-saving cabinet uses gaps that would otherwise be empty.
12. The Roll-Out Baking Sheet Storage

Store flat items and appliances together. Use a cabinet divider to create slots for baking sheets and cutting boards. The space in front is perfect for a bin holding a hand mixer and its beaters. This DIY divider can be made from wood or purchased. It organizes two types of items in one drawer.
13. The Island Appliance Hub

Turn your island into a work center. Have outlets installed on the side or end. This gives you a place to use appliances without crowding the main counters. For a simple update, use a power strip with a long cord. Your island becomes a flexible workspace for cooking and other projects.
14. The Drop-Down Countertop Extension

Add temporary counter space. A hinged section of countertop can fold down when not in use. Lift it up when you need room for an appliance. This is great for very small kitchens. A budget-friendly version can be made from a sturdy shelf and strong hinges. This fold-away surface appears only when you need it.
15. The Appliance Clustering Strategy

Group appliances by task. Keep all your baking tools in one area and coffee supplies in another. This saves steps while you work. You are not running across the kitchen for the next item. Use a small cart or tray to define each cluster. This task-based grouping makes cooking more efficient.
16. The “Landing Strip” Charging Station

Create a home for electronics. Designate a spot where devices charge overnight. Use a power strip on the counter or in a drawer with a cord hole. This prevents cords from spreading across the kitchen. A wooden box with a hole in the back can hide the power strip. This dedicated charging spot reduces visual clutter.
17. The Hanging Pot Rack & Plug

Combine hanging storage with power. A pot rack frees up cabinet space. By adding an outlet nearby, you can also use appliances right under it. This is perfect for a slow cooker or electric griddle. This overhead outlet keeps cords off the floor and counters.
18. The Spice Rack & Blender Nook

Store spices and a blender together. A tall, narrow cabinet can be divided. One side holds a pull-out spice rack. The other side has space for your blender. This puts everything for smoothies or sauces in one place. A simple shelf insert can create this dual-purpose storage.
19. The Drawer-Within-A-Drawer

Use drawer depth wisely. A shallow tray sits on top of a deeper drawer. The tray holds small tools. The space underneath stores a compact appliance. This two-level system doubles your storage. You can use a baking sheet or a DIY wood frame as the top tray.
20. The Fold-Down Appliance Shelf

Mount a shelf that folds against the wall. It can hold a microwave or other medium-sized appliance. When you are done, fold it up to free up floor space. This is ideal for a small kitchen or pantry. Use strong brackets for a secure fold-away shelf.
21. The Tiered Countertop Display

Use height to save space. A tiered stand lets you place two appliances in the footprint of one. This keeps your counter organized and easy to clean. A simple DIY stand can be made from wood or purchased. This vertical arrangement makes the most of your surface area.
22. The Slimline Appliance Cart

Add storage that moves. A slim cart on wheels can hold one or two appliances. Roll it out when you need it and tuck it away when you do not. This is a budget-friendly and flexible solution. A mobile cart gives you extra space without a renovation.
23. The Open Shelf Power Zone

Combine open shelves with accessible power. Mount a power strip on the side of a shelf. This allows you to use appliances right where they are stored. It looks good and works well. This accessible power makes open shelving more functional.
24. The All-in-One Kitchen Workhorse

Reduce clutter by choosing one appliance that does many jobs. A combination oven can air fry, bake, and toast. This replaces several single-use gadgets. It saves a lot of counter and storage space. Investing in a multi-use machine can simplify your kitchen tools.
Start with one idea that fits your space. Pick the simplest project first. A new power strip or a simple tray can make a big difference. Small changes add up to a kitchen that works better for you every day.