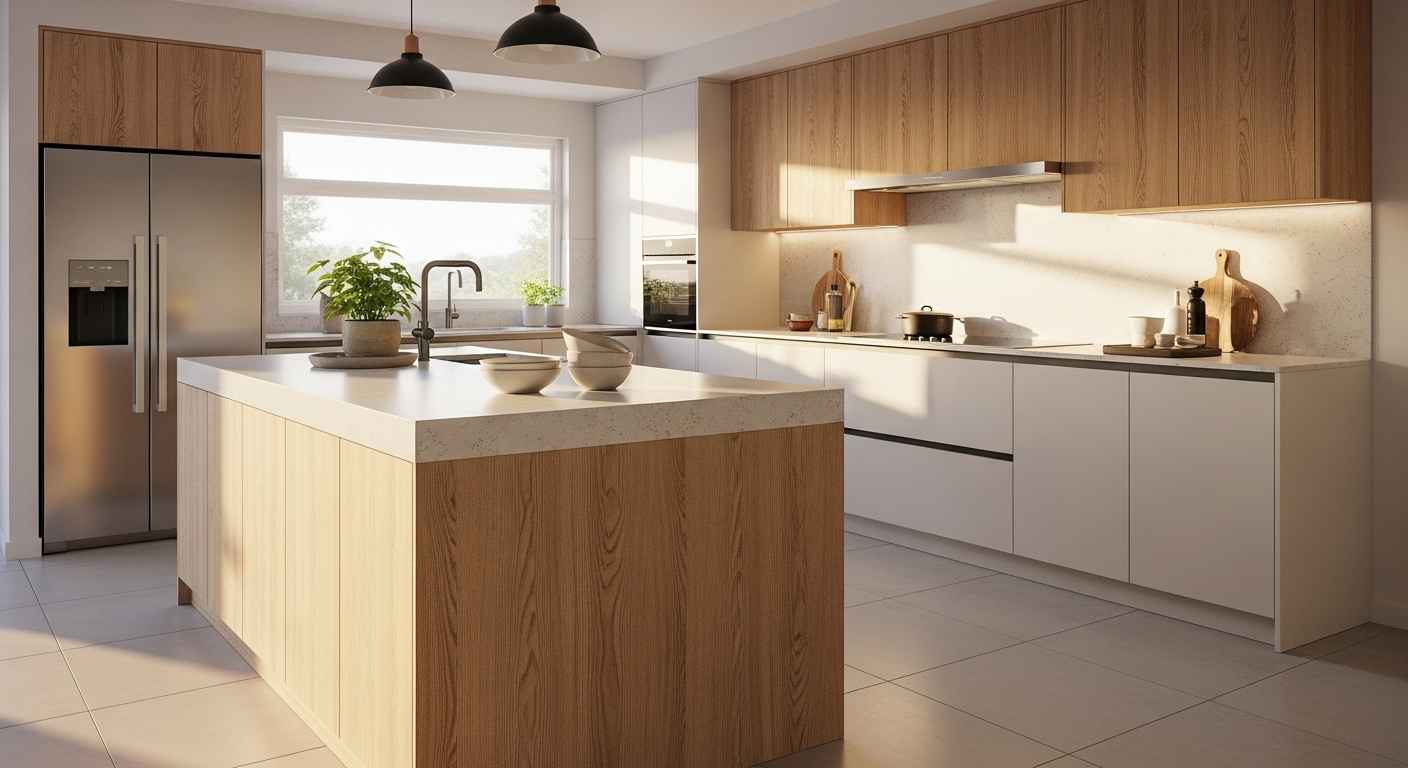
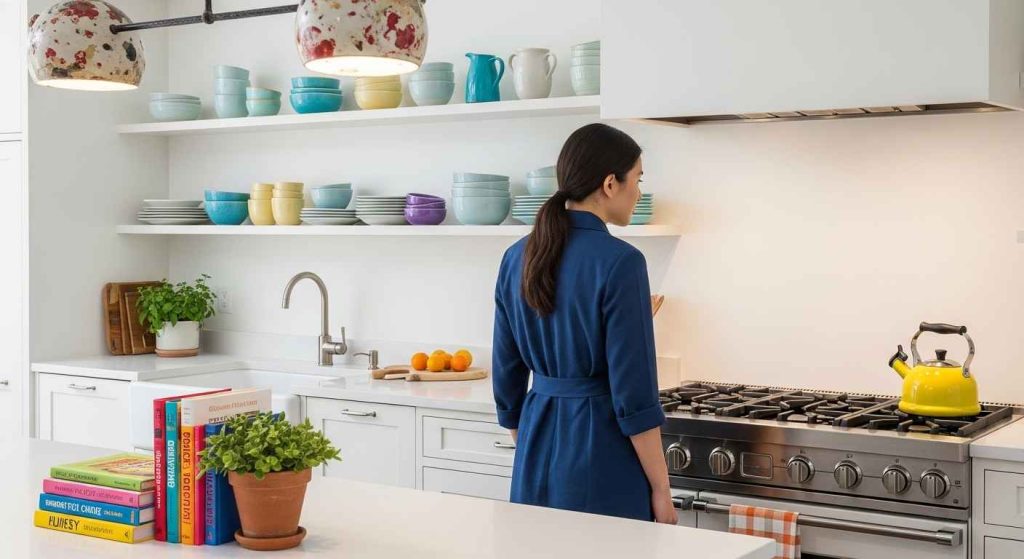
Your kitchen island does more than just provide extra counter space. The side panels offer a fantastic opportunity to add character and style. They can tie the whole room together or make the island a standout feature. From rustic to modern, there are endless ways to finish this surface. Here are some ideas to help you find the perfect look for your home.
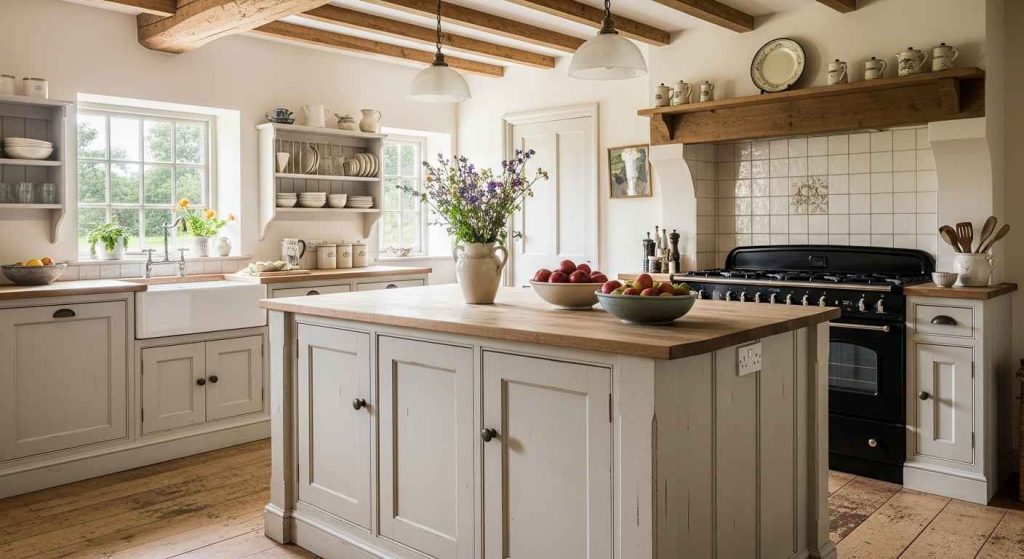
1. Reclaimed Wood Warmth
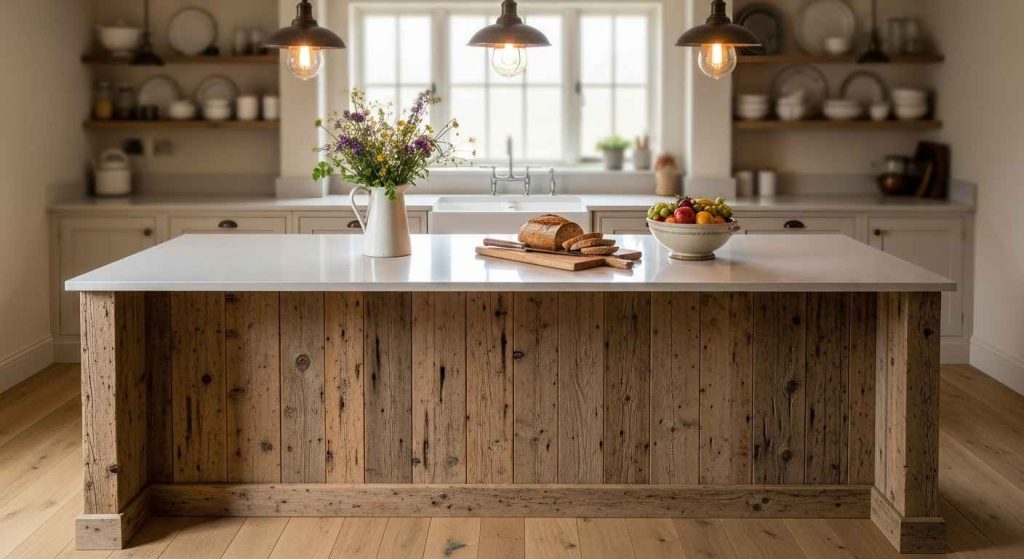
Reclaimed wood brings instant history and texture to a kitchen. Each piece has a unique story shown through its grain and nail holes. This material pairs well with both modern and traditional cabinetry. It adds a layer of organic warmth that makes a kitchen feel lived-in and comfortable. For a budget-friendly version, use new wood planks and apply a weathered stain. You can also sand and seal salvaged wood from an old barn or fence.
2. Sleek and Seamless Laminate
Laminate is a durable and cost-effective choice for a modern look. It comes in a huge range of colors and patterns, including realistic wood and stone effects. High-pressure laminate resists scratches, stains, and heat, making it great for busy homes. A simple wipe-down keeps it clean. For a DIY project, you can apply laminate sheets directly over existing panels. This is one of the most budget-friendly ways to get a high-end, seamless appearance.
3. Classic Shaker Style Panels
Shaker panels are a timeless choice. Their simple, recessed center panel design works with almost any decor. They are often painted, which allows you to easily match or accent your cabinet color. This style brings a sense of order and calm to a kitchen. Painting the panels yourself is an easy DIY task. You can also update old cabinets by adding a Shaker-style frame over a flat surface for a fresh look.
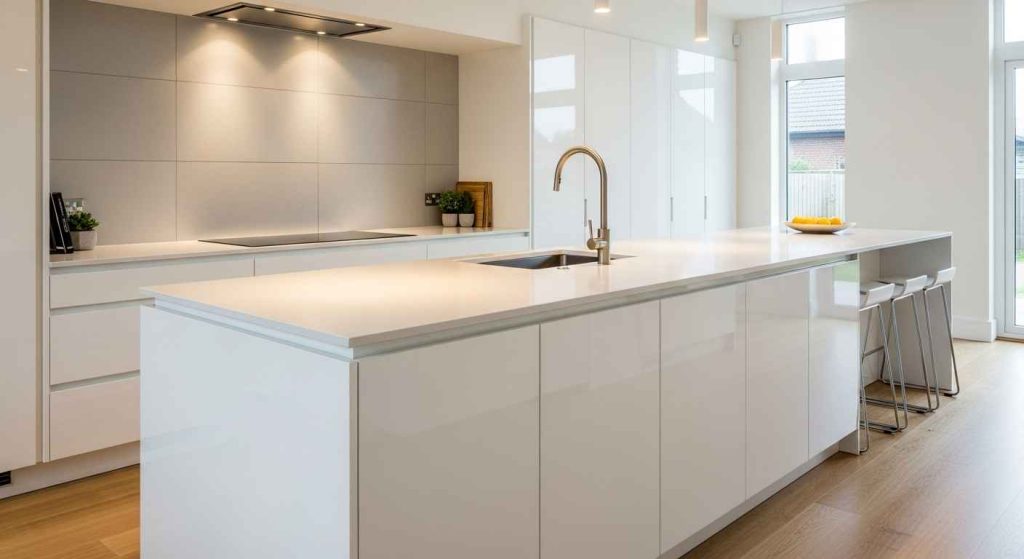
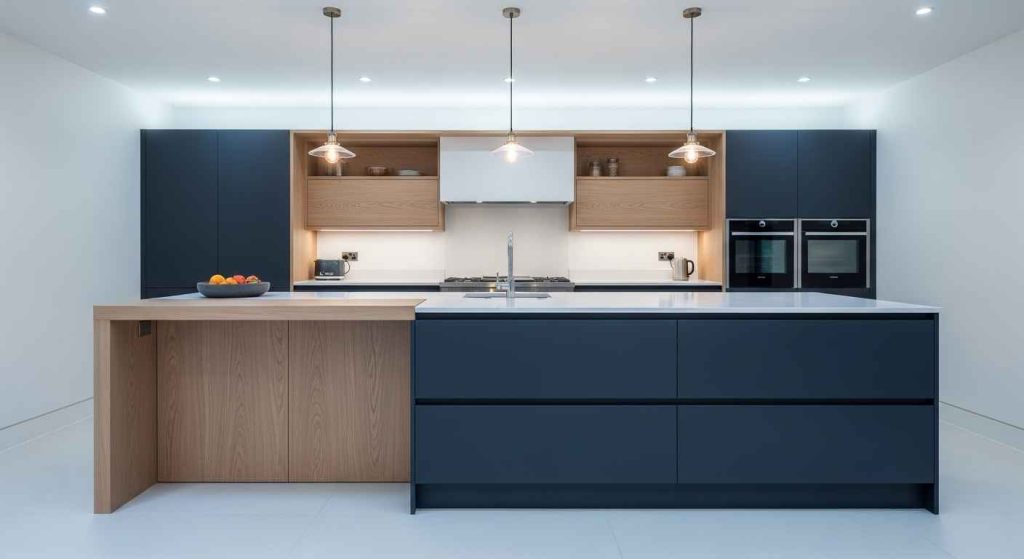
4. Dramatic Slab Door Fronts
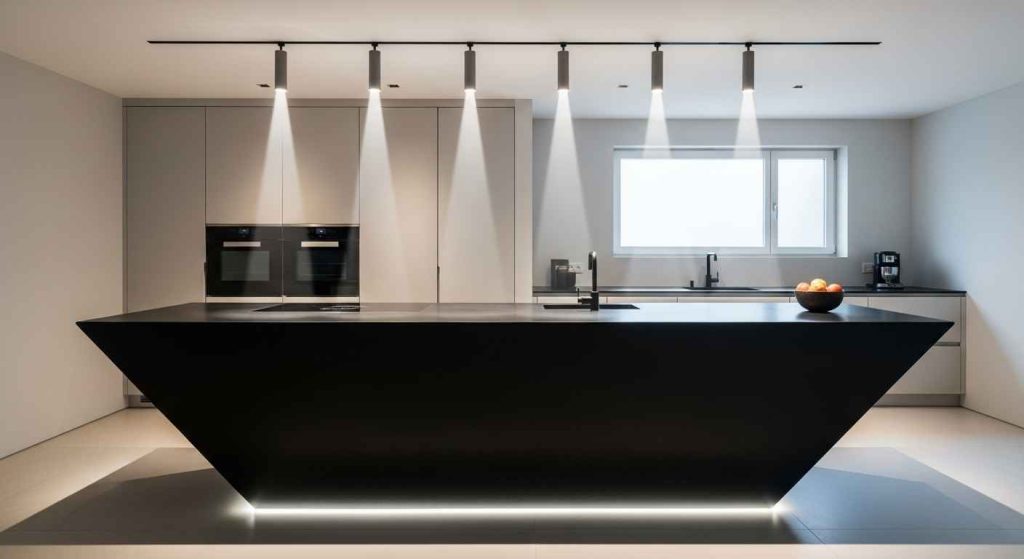
Slab fronts are all about clean, uninterrupted lines. This style has no grooves or detailing, creating a bold, solid appearance. It works beautifully in minimalist and contemporary kitchens. You can use materials like wood, laminate, or acrylic. To get this look on a budget, consider using a large sheet of MDF. Paint it a solid, dark color for a high-contrast effect. The lack of hardware gives a very sleek, built-in feel.
5. Textured 3D Tile Panels
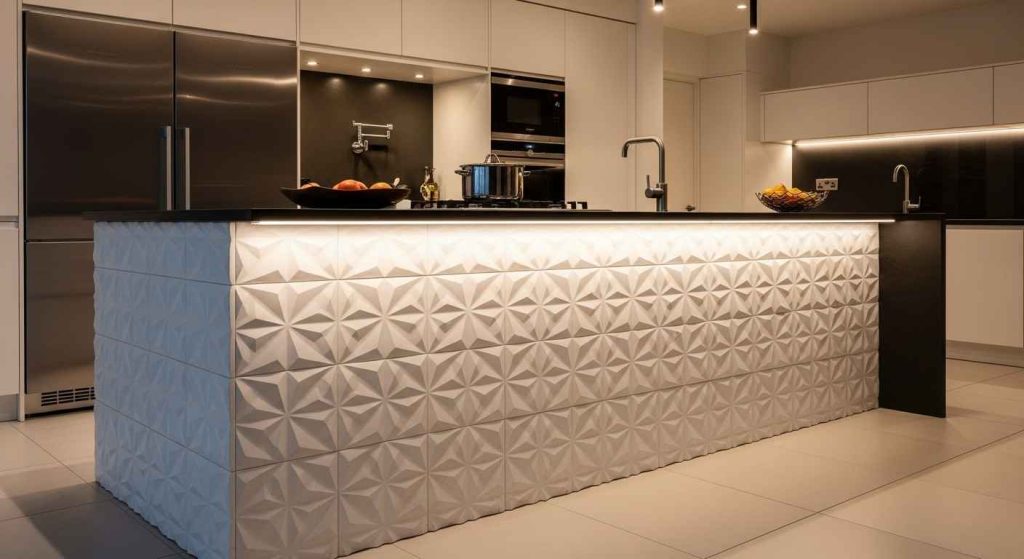
3D tiles add a sculptural element to your island. They create fascinating shadows and patterns as the light in the room changes. This turns a simple panel into a work of art. You can find tiles in geometric, organic, or wave-like patterns. For a budget-friendly approach, apply the tiles to just one side of the island as an accent. Using a simple tile adhesive makes this a manageable DIY project that delivers a big visual impact.
6. Rustic Beadboard Charm
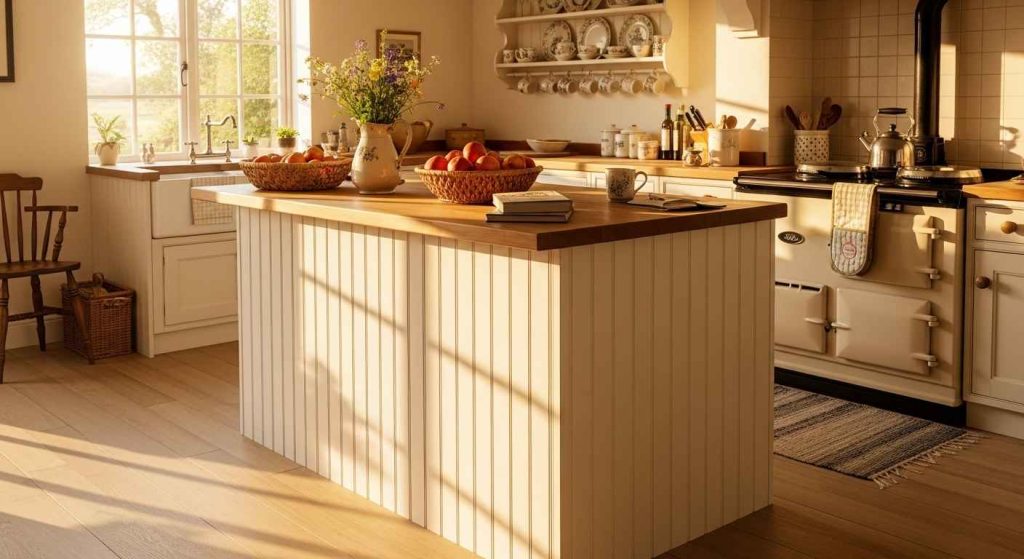
Beadboard introduces classic, vertical lines that feel both rustic and coastal. It is often painted white for a bright, airy look. This paneling is great for hiding minor imperfections on older islands. It brings a sense of casual comfort to the space. You can install beadboard panels directly over an existing flat surface. This is a very budget-friendly update. A fresh coat of paint can make it look brand new and perfectly suited for a farmhouse style.
7. Industrial Metal Mesh Inserts
Metal mesh adds an industrial, functional feel. It allows for subtle visibility into open shelving behind it, which is both practical and stylish. This material is sturdy and easy to clean. It pairs well with concrete countertops and exposed brick. For a DIY version, you can source metal mesh from a hardware store. Cut it to size and secure it within a wooden frame on your island’s side. This adds texture without a major renovation.
8. Bold and Graphic Patterns
Make your island a focal point with a strong pattern. Think large-scale geometric shapes, stripes, or even a mural effect. This approach works well if the rest of your kitchen is fairly simple. It injects personality and energy. Using removable wallpaper is a great budget-friendly and non-permanent way to test this look. You can change the pattern whenever you want a new style without any commitment.
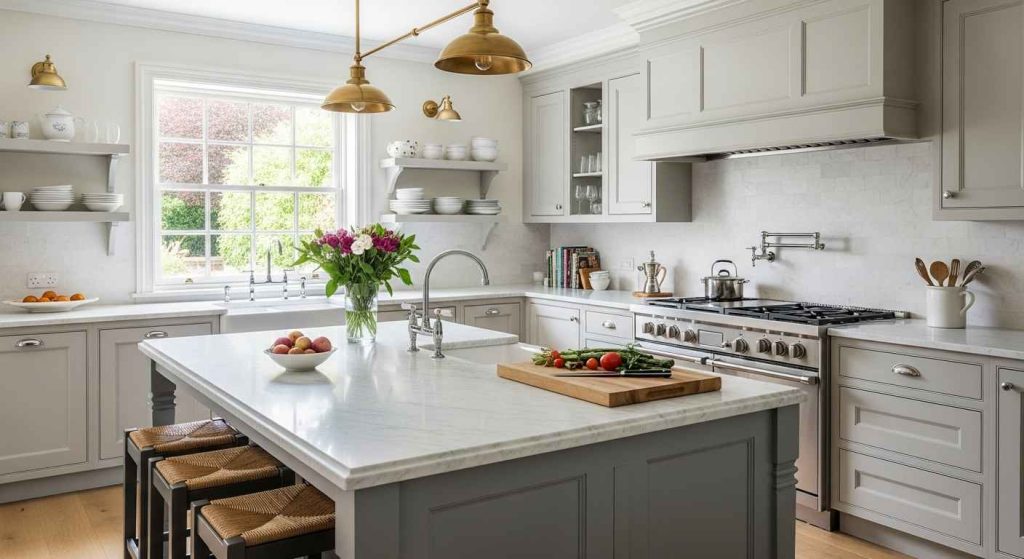
9. Modern Two-Tone Contrast
A two-tone island adds visual interest and depth. Painting the island base one color and the panels another clearly defines its structure. This is a great way to incorporate a pop of color without overwhelming the room. A simple DIY project is to paint just the panels a different shade than the base. This is a budget-friendly trick that makes a custom-designed statement. It helps the island feel anchored yet distinct.
10. Elegant Marble Slab Sides

Using a marble slab for the island panel is the height of luxury. It creates a seamless, high-end look, especially if it matches your countertop. The natural veining ensures that no two islands are alike. For a budget-friendly alternative, look for large-format porcelain tiles that mimic marble. These are more durable and less expensive. You can also use a marble contact paper for a temporary, convincing look that’s easy to apply.
11. Hand-Painted Artistic Panels
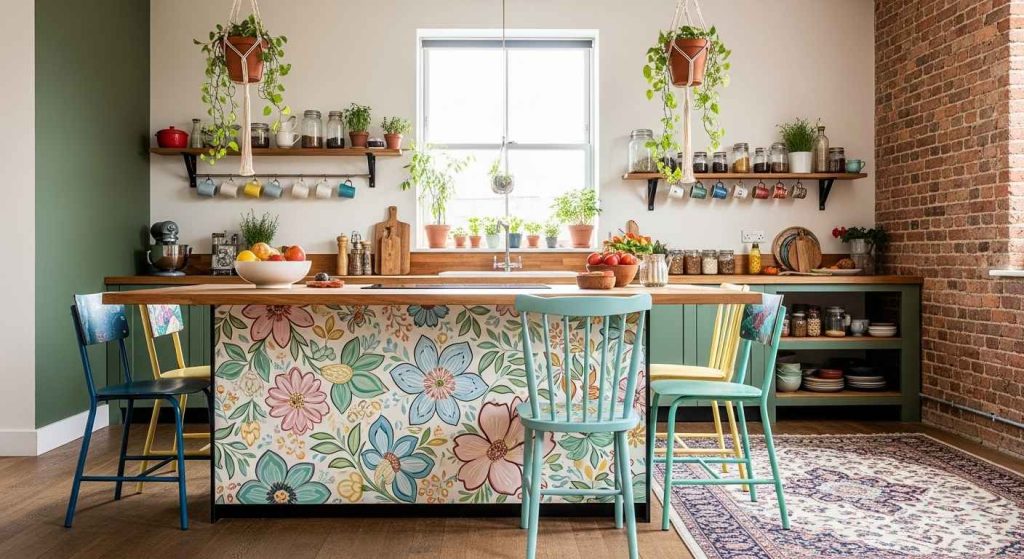
Turn your island into a canvas. A hand-painted design makes your kitchen completely unique. You can choose a pattern that reflects your personal style, from florals to abstract art. This is a very personal touch. If you’re not an artist, using stencils is a great DIY method. You can also commission a local artist for a one-of-a-kind piece. Seal the artwork with a clear topcoat to protect it from spills and wear.
12. Sustainable Cork Coverings
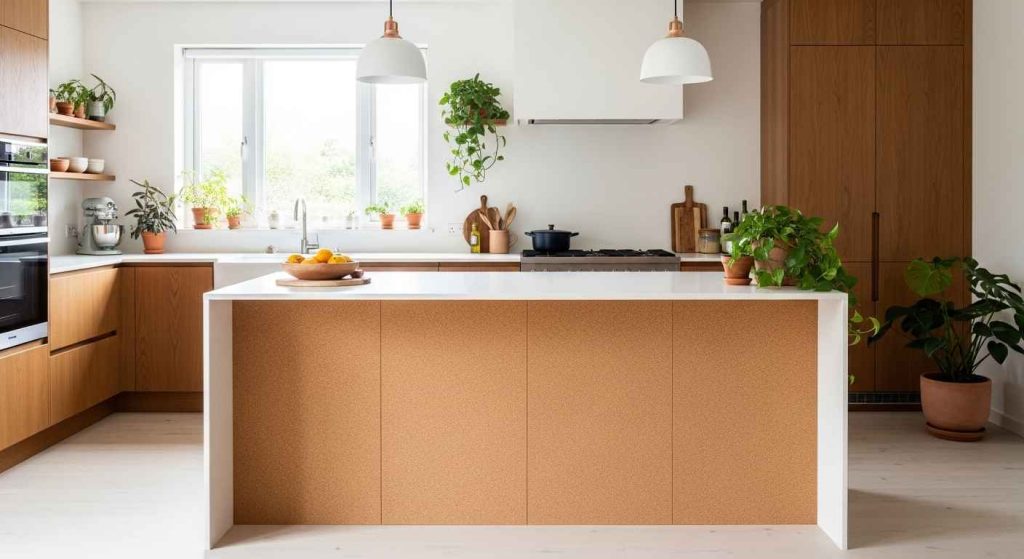
Cork is a sustainable and warm material. It provides a soft, sound-absorbing surface that is naturally antimicrobial. The texture adds visual and tactile interest. Cork tiles are easy to install with adhesive. This is a very budget-friendly project. You can cut cork rolls to size and glue them on for an instant update. Finish it with a water-based sealant to make it durable and easy to clean.
13. Timeless Tongue and Groove
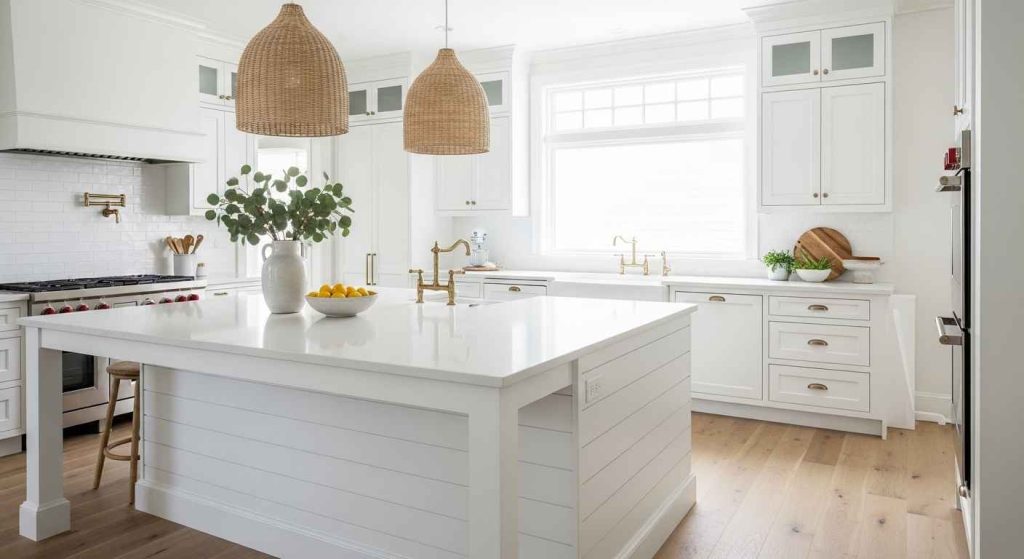
Tongue and groove paneling offers a clean, streamlined look. It can be installed horizontally to make a space feel wider or vertically for height. This style is incredibly versatile and durable. It is often painted, which makes it easy to refresh. Installing tongue and groove planks is a straightforward DIY task. You can find pre-primed boards at most home improvement stores, which saves time on preparation.
14. Luxurious Leather-Wrapped Panels
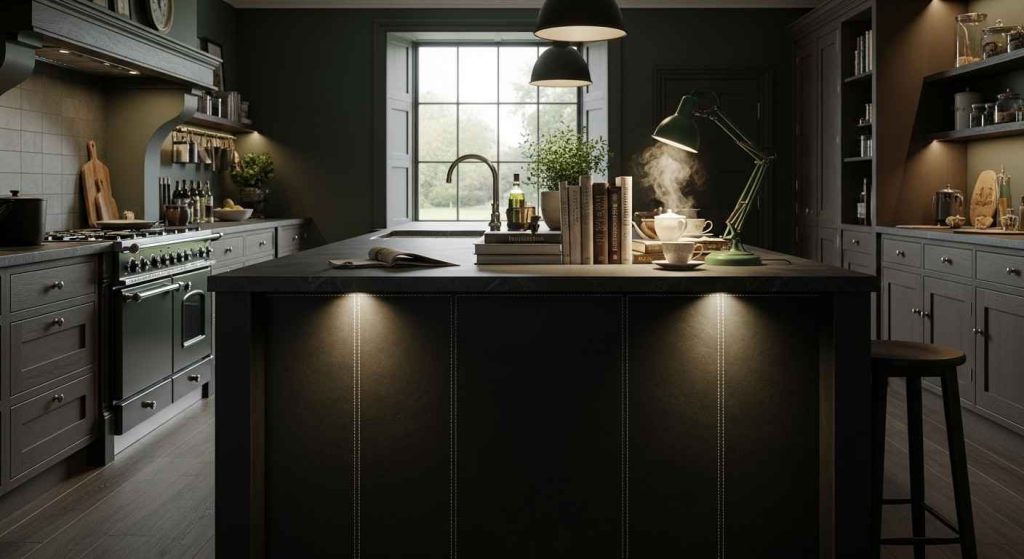
Leather adds a surprising touch of luxury and warmth. It feels soft to the touch and develops a beautiful patina over time. This is an unexpected material that makes a strong style statement. For a budget-friendly version, use leather-look vinyl that is easy to clean and install. You can also upholster a panel with a piece of real leather, securing it with decorative tacks for a custom, high-end finish.
15. Geometric Laser-Cut Designs
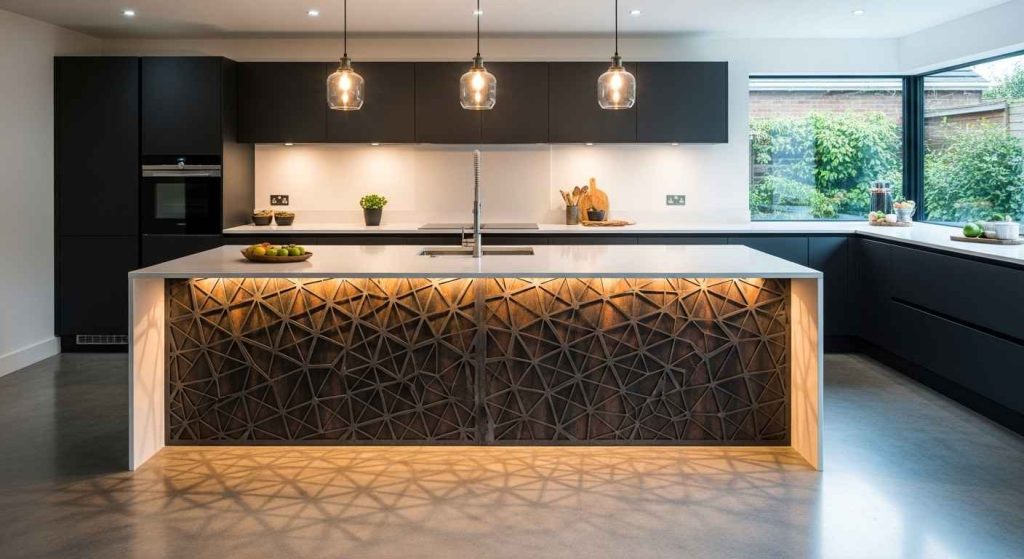
Laser-cut panels create delicate, precise patterns. They can be made from wood, metal, or acrylic. When backlit, they cast beautiful shadows, adding another layer of design. This look is very modern and artistic. For a DIY alternative, you can use a jigsaw to create a simpler pattern in a wood panel. Painting the cut-out panel a contrasting color will make the design stand out even more.
16. Chalkboard for Functionality
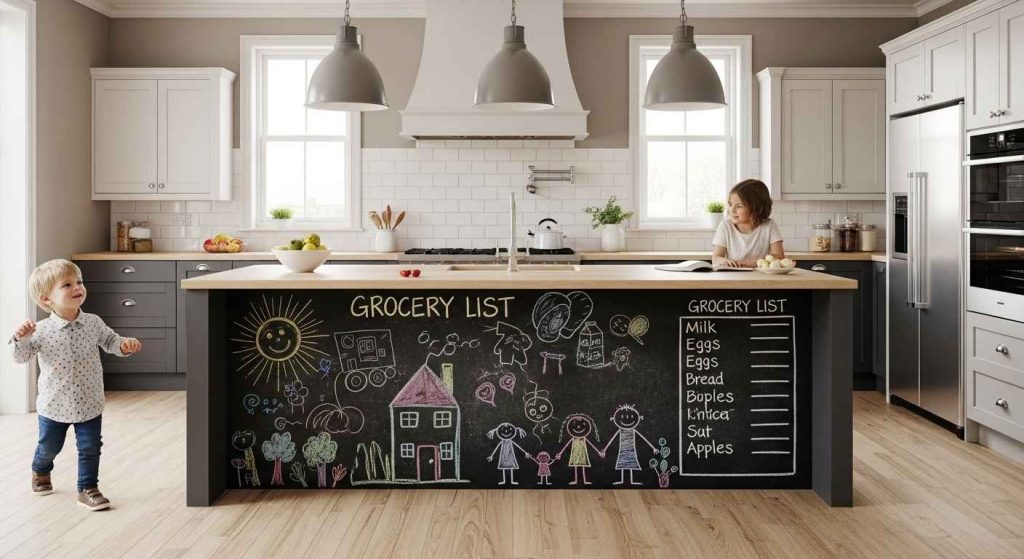
A chalkboard panel is both fun and functional. It’s perfect for grocery lists, menus, or letting kids draw. It adds a casual, interactive element to the kitchen. Applying chalkboard paint is an easy and very budget-friendly DIY project. You can paint one entire side or just a section of the panel. Remember to season the chalkboard by rubbing chalk sideways over it before use for easier erasing.
17. Woven Natural Fiber Panels
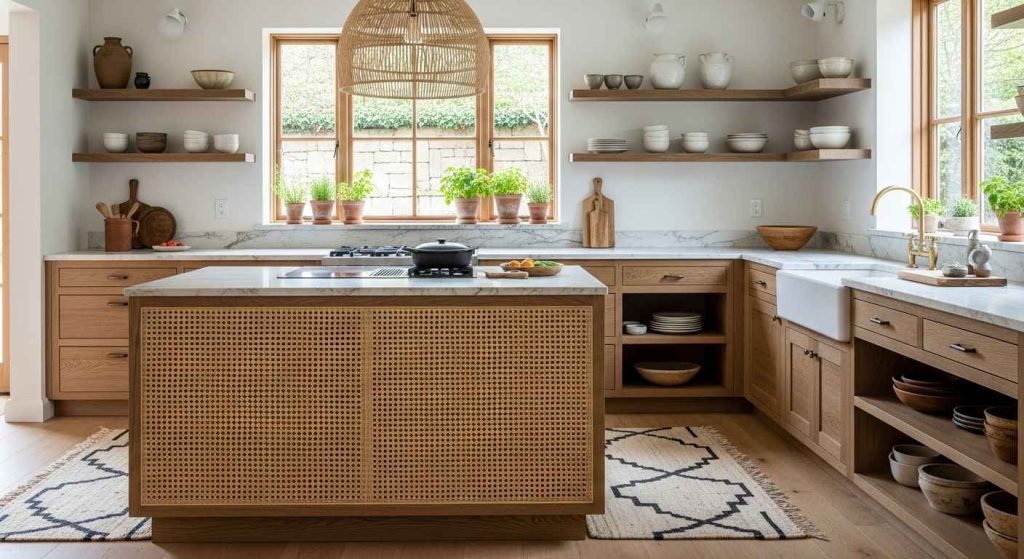
Woven materials like rattan or cane bring a natural, textured look. They add warmth and a slightly rustic, global feel to the kitchen. This material works well in spaces that aim for a relaxed, organic style. You can find pre-made cane webbing that is very budget-friendly. Simply cut it to fit inside a frame on your island’s side and secure it with a staple gun for an instant update.
18. Mirrored Panel Illusions
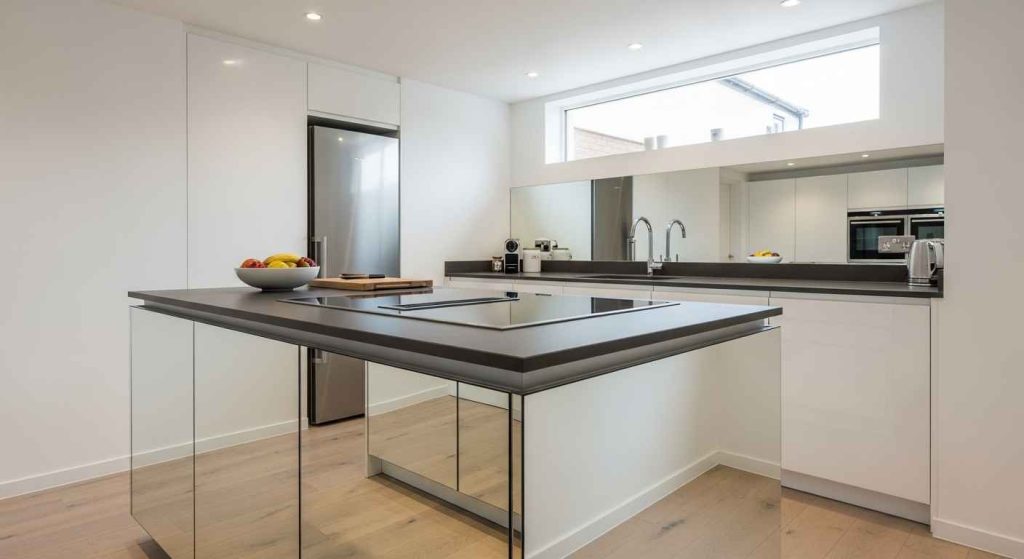
Mirrored panels can make a small kitchen feel much larger and brighter. They reflect light and the view of the room, creating a sense of depth. This is a glamorous and practical solution for compact spaces. Using mirror tiles is a budget-friendly and simple way to achieve this. You can adhere them directly to the island’s side. It’s a clever trick that opens up the space visually.
19. Colorful Terrazzo Finishes
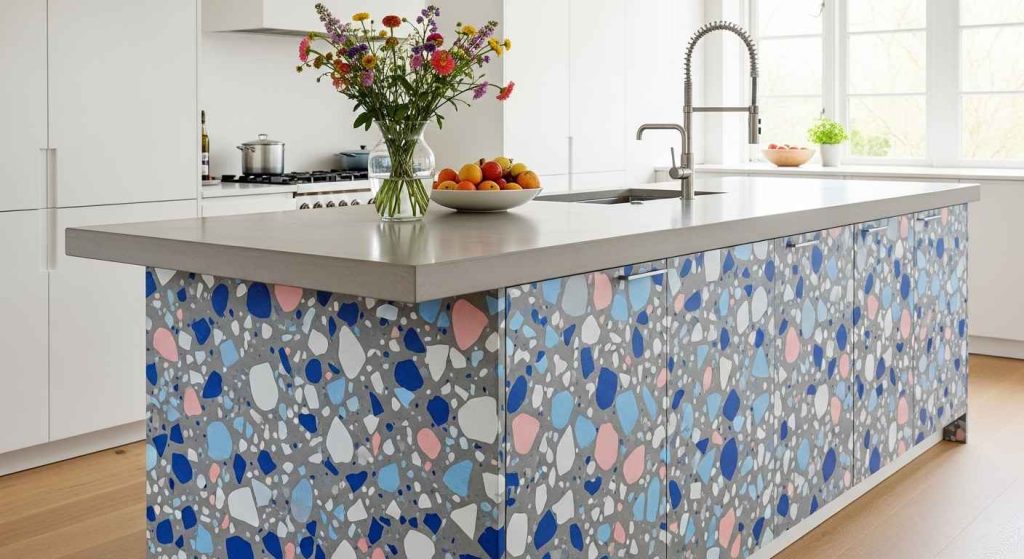
Terrazzo is a composite material full of colorful chips of marble, glass, or quartz. It’s durable, unique, and full of personality. This finish adds a playful, retro-modern vibe. For a DIY version, you can use terrazzo-pattern laminate or wallpaper. Another budget-friendly idea is to create a terrazzo effect with paint by flicking different colored paints onto a base coat and then sealing it with a clear varnish.
20. Distressed Farmhouse Finishes
A distressed finish gives an island a timeworn, comfortable feel. This style hides everyday nicks and scratches well, making it practical for a busy kitchen. It adds instant charm and character. You can achieve this look yourself with a simple DIY technique. Paint your panel a base color, let it dry, then add a top coat. Once the top coat is tacky, lightly sand areas to reveal the base color underneath.
21. Curved and Sculptural Forms
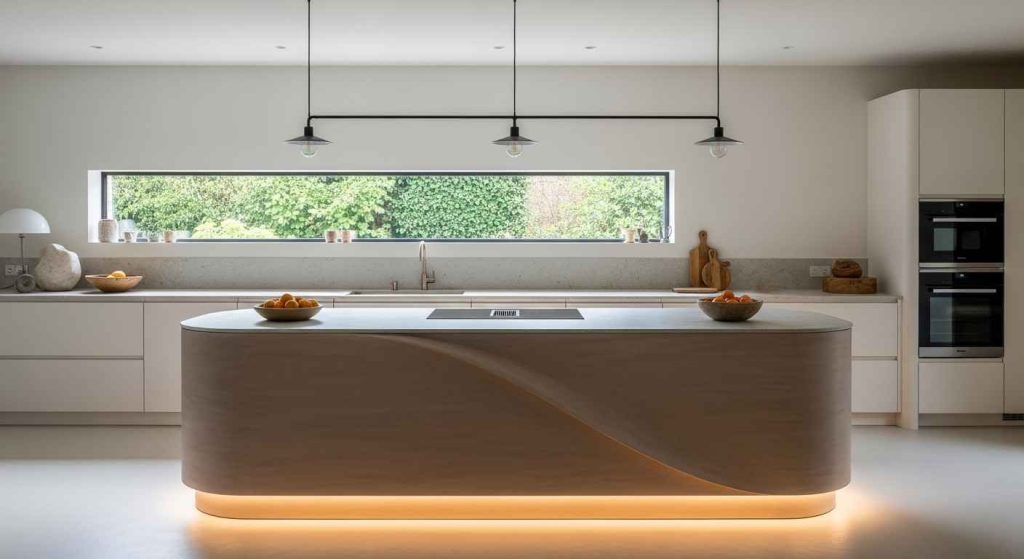
Curved panels soften the hard lines of a kitchen. This sculptural approach turns the island into a piece of furniture art. It feels organic, modern, and inviting. Creating a curved front from scratch is complex, but for a DIY approach, you can build up layers of flexible plywood to form a gentle curve. Sand it smooth and paint it to match your kitchen for a custom, flowing shape.
The right panel can completely change your island’s presence. You do not need a full kitchen remodel to try something new. Start with one small idea that speaks to you. A simple coat of paint, a roll of wallpaper, or a new tile can make a big difference. Choose a finish that makes your kitchen feel more like you.