A kitchen cabinet upgrade can change the whole room without a full remodel. These ideas range from simple weekend projects to more involved changes. Many offer a great return and make your kitchen work better for you. Start with one small change and see the difference it makes.
1. A Fresh Coat of Paint

Painting cabinets is one of the most effective changes. It covers old finishes and introduces new color. Choose a durable paint made for cabinets to resist chips and stains. Clean and sand surfaces thoroughly before you start. A good primer is key for a lasting finish. For a budget-friendly update, paint just the lower or upper cabinets for a two-tone effect. New paint makes old wood look new again.
2. Modernize with New Hardware

Swapping hardware is like putting new jewelry on your kitchen. It instantly updates the style. Measure the distance between screw holes on your old pulls to get the right size. Mixing knob and pull styles can add visual interest. This is a simple DIY project you can do in an afternoon. Choose a finish that complements your faucet and appliances for a cohesive look. It is a small detail with a big effect.
3. Install Under-Cabinet Lighting
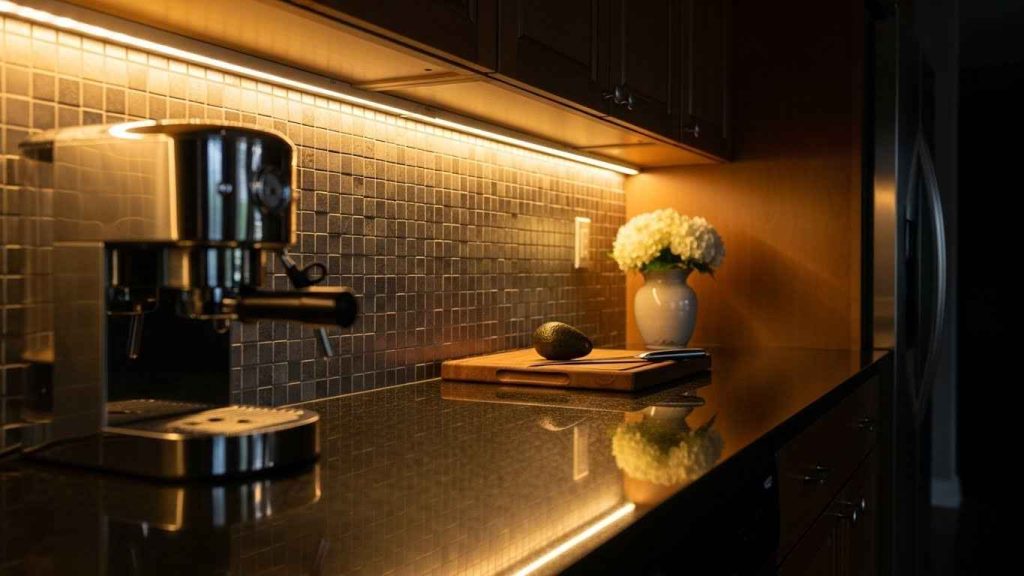
Good lighting makes any kitchen safer and more pleasant. Under-cabinet lights illuminate countertops for food prep. LED tape lights are easy to install and energy efficient. They plug into an outlet or can be hardwired. You can find budget-friendly battery-operated options that stick on with adhesive. This lighting adds both function and ambiance to your kitchen. It makes the space feel warmer and more welcoming in the evening.
4. Add Glass Fronts to Doors

Glass front doors make a kitchen feel more open. They break up the solid wall of cabinetry. You can replace a few doors or just the center panels on existing ones. This is a chance to display nice dishes or glassware. For a DIY approach, remove a cabinet door and carefully cut out the center panel to insert glass. It encourages you to keep the contents organized. Frosted or textured glass can hide less tidy items.
5. Upgrade to Soft-Close Hinges

Soft-close hinges prevent doors from slamming. They close quietly and gently every time. This upgrade adds a touch of quality and protects your cabinets from wear. The hinges are relatively easy to install yourself. You can often retrofit them onto your existing cabinets. This is a small change that you will appreciate every single day. It makes the kitchen feel more refined and peaceful.
6. Install Pull-Out Shelves

Deep cabinets can become black holes where items get lost. Pull-out shelves bring everything into view. You will not have to get on your knees to search for a pot again. These systems can be installed as DIY kits from a home improvement store. They maximize storage and reduce clutter. You gain easy access to every item stored inside. It is a practical upgrade that simplifies cooking.
7. Apply Stylish Contact Paper

Contact paper is a quick way to add pattern or color inside your cabinets. It protects shelves from scratches and stains. This is a very budget-friendly project. Measure the shelf, cut the paper, and peel off the backing. Using a squeegee helps remove air bubbles for a smooth finish. It makes opening your cabinets a pleasant surprise. Choose a design that makes you happy.
8. Replace Solid Doors with Open Shelving

Open shelving creates an airy, accessible feel. It is perfect for displaying everyday dishes and decorative items. You can build your own shelves with wood brackets from a hardware store. This project opens up the visual space in a smaller kitchen. Be mindful to keep the shelves tidy, as everything is on display. It encourages a minimalist and organized approach to your kitchenware.
9. Add Crown Molding for Elegance

Crown molding gives cabinets a built-in, high-end appearance. It fills the gap between the top of the cabinets and the ceiling. Pre-made molding is available at most home centers. You can cut and install it yourself with a miter box and nails. Painting the molding to match your cabinets creates a seamless look. This detail makes standard cabinets look custom-made. It draws the eye upward, making the room feel taller.
10. Install Toe-Kick Drawers

The space under your cabinets is often wasted. A toe-kick drawer uses this area for slim items. It is perfect for storing baking pans, trays, or placemats. These drawers are shallow but wide, making use of every inch. You can find DIY kits or have them custom-built. It is a clever way to gain extra storage without changing your kitchen’s footprint. This is a smart solution for a compact kitchen.
11. Create a Two-Tone Cabinet Look

Painting your upper and lower cabinets different colors adds visual depth. A common approach is a darker color on the bottom and a lighter one on top. This can make lower cabinets feel grounded and uppers feel airy. You do not have to paint all the cabinets; start with an island for a pop of contrast. This technique defines different zones in the kitchen. It is a simple way to add a designer touch.
12. Add Functional Cabinet Inserts

Cabinet inserts organize your storage from the inside out. Think about pull-out trash bins, tray dividers, or door-mounted racks. These solutions keep items sorted and easy to find. Many are available as standard sizes that fit common cabinets. They turn chaotic spaces into orderly ones. Measuring your cabinet interior first is the most important step. This makes your kitchen work more efficiently for you.
13. Refresh with New Knobs and Pulls

New knobs and pulls provide an instant style update. This is one of the easiest and least expensive changes you can make. Consider the finish; matte black and brass are popular choices. Think about comfort; hold a few in your hand at the store to see what feels best. This small change has a big visual impact. It is a project that requires only a screwdriver and a little time.
14. Frame Your Cabinets for a Custom Look

Framing your cabinet doors adds architectural detail. You can use thin strips of wood to create a picture frame effect on flat cabinet fronts. This is a more advanced DIY project but very rewarding. Glue and nail the wood strips in place, then caulk the seams for a smooth finish. Paint everything the same color for a unified look. It transforms basic cabinets into something special.
15. Apply a Professional Glaze

A glaze can add depth and dimension to painted cabinets. It is a tinted coating applied over a base coat of paint. You wipe most of it off, leaving color in the recessed areas. This technique highlights the cabinet’s details. Practice on a spare piece of wood or the inside of a door first. It creates a rich, layered finish that looks professionally done. This works well with traditional or rustic styles.
16. Install In-Cabinet Charging Stations

Keep countertops clear of cords and devices. A charging station inside a cabinet keeps electronics powered but out of view. You can install a simple power strip or a dedicated charging dock. Drill a small hole in the back of the cabinet for cords to reach an outlet. This is a simple way to reduce counter clutter. Everything has a place, and your kitchen stays looking tidy.
17. Add Decorative Corbels and Brackets

Corbels and brackets provide both support and style. They are often used under islands or open shelving. Choose a design that matches your kitchen’s aesthetic, from simple to ornate. They are typically made of wood or polyurethane. Installing them is straightforward with strong brackets and screws. They add character and a sense of permanence. This is a small architectural detail that makes a big statement.
18. Upgrade to Sliding or Pocket Doors

Sliding or pocket doors save space compared to traditional swinging doors. A barn door adds rustic charm, while a pocket door disappears into the wall. This is a great solution for pantries or cabinets in tight spaces. It is a functional choice for small kitchens. Check that you have enough wall space beside the opening for a sliding door to travel. This upgrade improves traffic flow.
19. Create a Built-In Appearance

Make your cabinets look like they were always part of the house. Fill gaps with trim and extend cabinets to the ceiling with a soffit or additional storage. Painting the cabinets the same color as the walls helps them blend in. The goal is a smooth, continuous line. This approach makes the kitchen feel larger and more intentional. It creates a clean, unified look.
20. Add Open Plate Racks
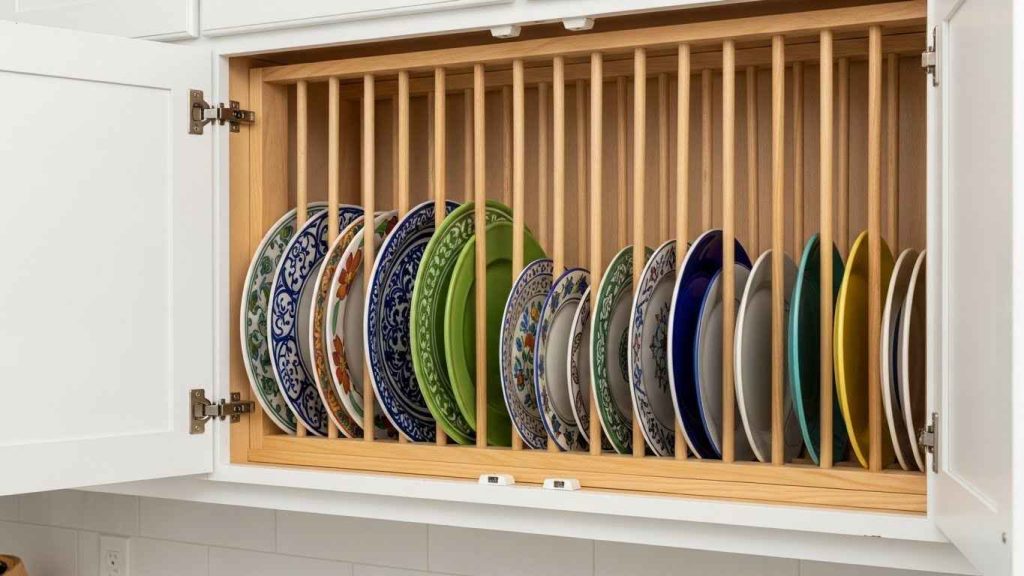
An open plate rack keeps your everyday dishes within easy reach. It also acts as a decorative display. You can find racks that fit inside a cabinet opening or ones that mount on the wall. Storing plates vertically can save space. It combines easy access with attractive storage. This is a charming feature for a cottage or farmhouse style kitchen.
21. Install Task-Specific Organizers

Get organizers designed for what you store. Use a cutlery tray for utensils, a pan organizer for pots, and a lid holder for lids. This stops items from jumbling together. Many organizers are adjustable, so you can customize the layout. This system saves time and frustration when you are cooking. You will always know where to find what you need.
22. Refresh with Peel-and-Stick Backsplashes

A backsplash update frames your cabinets. Peel-and-stick tiles are a budget-friendly and renter-friendly option. They come in many styles that mimic real tile, metal, or stone. The application is simple; just measure, peel, and stick. It protects your walls from splatters while adding style. This is a one-day project that makes a noticeable difference behind your countertops.
23. Add Under-Cabinet Wine or Glass Racks
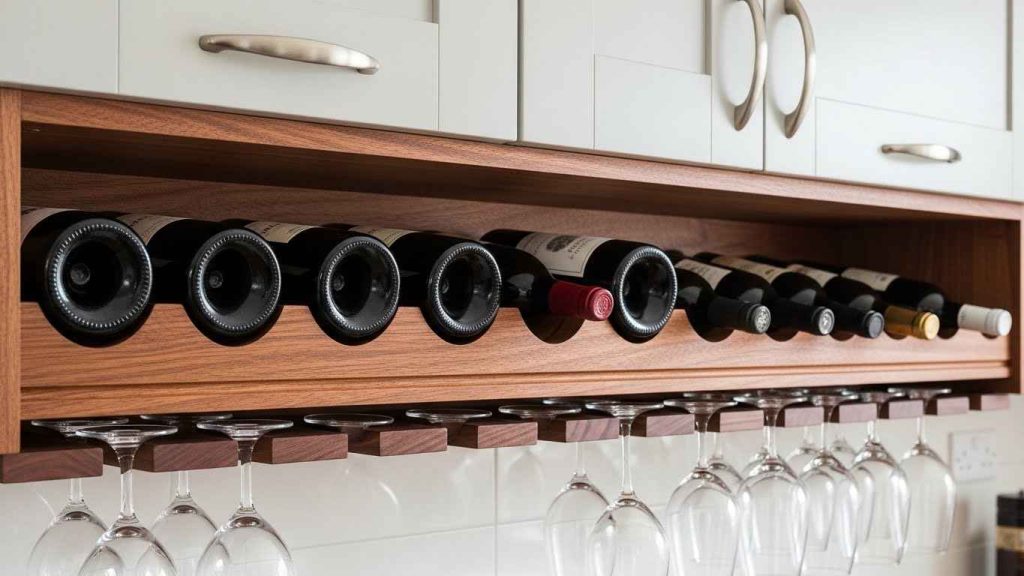
Utilize the space under your upper cabinets. A mounted wine rack keeps bottles handy but off the counter. Hanging glass racks store stemware securely and free up cabinet space. These are usually easy to install with a few screws. It is a smart use of often-wasted space. This setup is perfect for anyone who enjoys entertaining.
24. Replace Upper Cabinets with Floating Shelves

Floating shelves create a more open and modern feel than bulky upper cabinets. They are great for displaying attractive items and keeping essentials close by. You can make shelves from reclaimed wood or buy pre-made ones. Ensure they are securely anchored to wall studs. This change can make a small kitchen feel much larger. It encourages a curated, minimalist approach to your belongings.
25. Install Smart Cabinet Lighting Systems

Smart lighting lets you control your cabinet lights with your phone or voice. You can change colors for mood or set bright white for tasks. Many systems are wireless and easy to install with adhesive strips. Set schedules for the lights to turn on and off automatically. It adds a layer of modern convenience. This technology integrates your kitchen into your smart home.
You do not need to do everything at once. Pick one project that fits your skill level and budget. A single change, like new hardware or a coat of paint, can make your kitchen feel new. Start small and build from there. Your efforts will make your kitchen a better place to be every day.